Barbara Willis said the following in thebCloth Doll Workshop book:
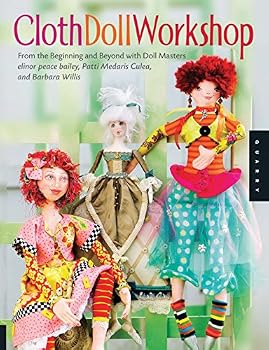
The book Cloth Doll Workshop is a collaboration between 3 of the giants in the history of soft doll making: elinor peace bailey – barbara willis – patti medaris culea
“I am delighted to be collaborating with two of my favorite friends and
cloth-doll artists, elinor peace bailey and Patti Culea. Our passion for the
doll as an art form drew us together many years ago. Our mutual admiration
for each other’s artistic path has helped us form a strong bond of friendship,
as well as a friendly competition to become better selves and artists. The
diversity of our approaches to doll making has worked as inspiration as we
have carved out our own signature styles. So although each of us has our
own color sensibility and artistic strengths, we are able to work side by side
and bask in the success of the creative process that we each follow.” Barbara Willis
I consider it a blessing that I was able to study personally with elinor peace bailey. She is the true artist of the group. elinor peace bailey studied art at Parsons. Even her patterns are works of art–suitable for framing:
Patti Medaris Culea has been great about writing and publishing tips and tutorials about doll making and working with fabric:
“Patti has shared her soul with the doll world and has touched us all. Her
books on cloth-doll making have inspired many, and they have become
essential for cloth-doll makers. Beading, painting, and silk dying are just a
few of the tricks she pulls out of her hat for her unique creations. Patti has
lavished her artistic talents on her beautiful cloth dolls and shares it with all
of us.” Barbara Willis
“Dolls touch us in so many ways; they are an extension of the human
form, a creative outlet, and a sharing of ourselves with others. A basic cloth
doll can be a play doll meant for a child or it can be a simple creative outlet
in cloth-doll form. My dolls seem to fall in the later category, more as a
creative outlet for the inner artist. Although I made several dolls for my
children, I learned that I loved the doll-making process the most.
“You will find differences in style between elinor, Patti, and myself, as
well as in the requirements for each doll. We all have our favorite supplies
and techniques. You’ll find what works best for you. Experiment with all
the projects we are sharing with you, and find the approach that gives you
the most rewarding experience as you build your own personal toolbox and
create your own personalized cloth doll.” Barbara Willis
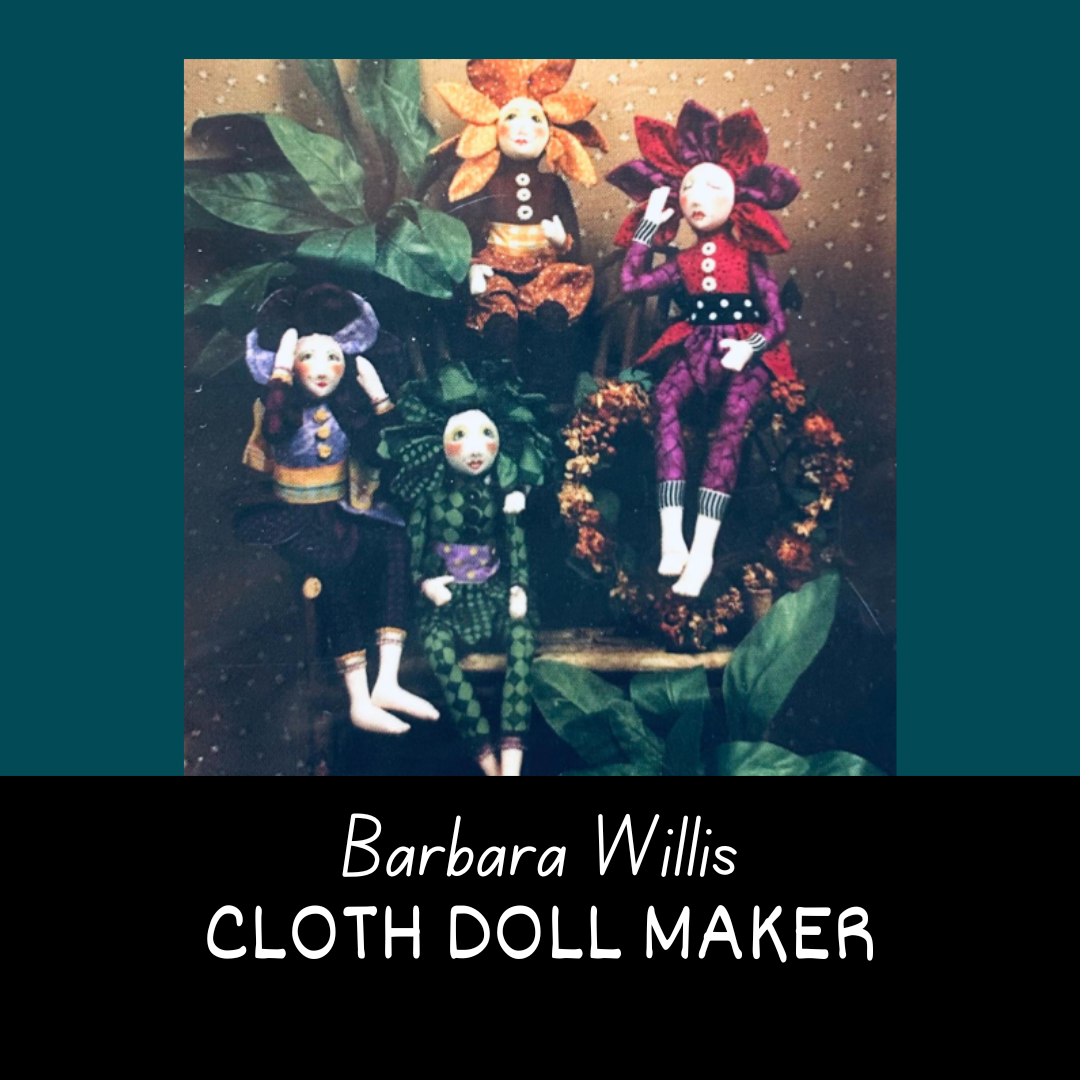
I wholeheartedly endorse the comments that Willis made about the importance of mutual support and appreciation among artists. With that, this post will take a look at some of the work of Barbara Willis.
“As I present my basic cloth doll techniques—including construction,
several costume ideas, and full facial development and coloration—keep in
mind that the treasure hunt for ideas and materials is as much fun as the
designing. Building a worthy stash of fabrics, notions, and trims to pull
from is a delightful part of cloth doll making. If you are wondering if your
doll will have the right trims, the answer is yes—because you pick what
you like—the colors, textures, and styles that draw you in. Local craft
stores, scrapbook stores, and fabric shops have heaps of stuff just waiting to
go home with you.
“If you love vintage, then flea markets, garage sales, and As I present my basic cloth doll techniques—including construction, several costume ideas, and full facial development and coloration—keep in mind that the treasure hunt for ideas and materials is as much fun as the designing. Building a worthy stash of fabrics, notions, and trims to pull
from is a delightful part of cloth doll making. If you are wondering if your
doll will have the right trims, the answer is yes—because you pick what
you like—the colors, textures, and styles that draw you in. Local craft
stores, scrapbook stores, and fabric shops have heaps of stuff just waiting to
go home with you. If you love vintage, then flea markets, garage sales, and thrift stores should be the focus of your gathering.
“As you can probably tell from my dolls, I love vintage textiles, and I lavish my dolls with items from my stash.
“It is important to have a space in which you can create and let your
imagination have its way—a space that inspires you to want to make art, a
spot you can call your own. It does not have to be a big space; even a table
that isn’t earmarked for the evening meal is a start.
“I have long had a large space in which to work, but for just as long I’ve
needed a professional organizer to dig in and straighten it out! I seem to
accumulate more things than I have space for and have a larger than normal
appetite for vintage findings, trims, ribbons, decorative papers, rubber
stamps, beads, charms, and buttons. Many of the fabrics I am currently
using are fabrics I purchased long ago—I have kept them so long that I
think they have become vintage! However, from all my fabric and trims, which are readily available and always close at hand, comes inspiration and
an environment for creativity, and for that I am grateful.
“I don’t have much wall space, so I have piles of things that I love all around me, with little
vignettes of special collections within eyeshot to keep me happy. Within the
messy veneer lies a studio ready to encourage the next design or project.
“When I am starting a project, I pull from my stash more fabrics and
embellishments than I will use, but the mountain of color, fiber, texture, and
glitz gets me jump-started without hesitation. I consider the mountain of
stuff the casting call or audition, while the finished project is the final result
of the sorting, incorporating, and eliminating.” [Jacki Note: Amen]
In Defense of Creative People Who Are Messy — Embrace The Glorious Mess That You Are!
Note: These initial words pinpoint my approach to creating and being a creative mess]
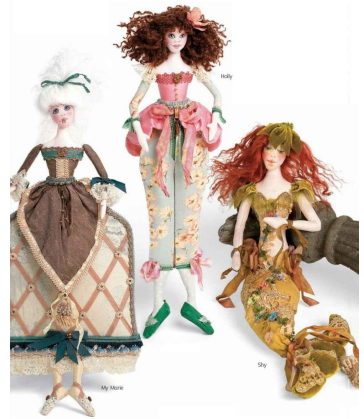
The basic doll pattern was built around a doll I fittingly named My Marie.
My Marie is a lovely rendition of an earlier era with a wide skirt made of
French toile fabric. But, if the skirt is narrowed at the hips and hem, you
create a totally different look, such as a casual lounge outfit reminiscent of
Holly Golightly from Breakfast at Tiffany’s fame, and so this doll is
appropriately named Holly. A more drastic narrowing of the lower hem edge
of the lower pattern piece transforms this design (with a little bit of stuffing
and a velvet tail) into Shy, a lovely mermaid.
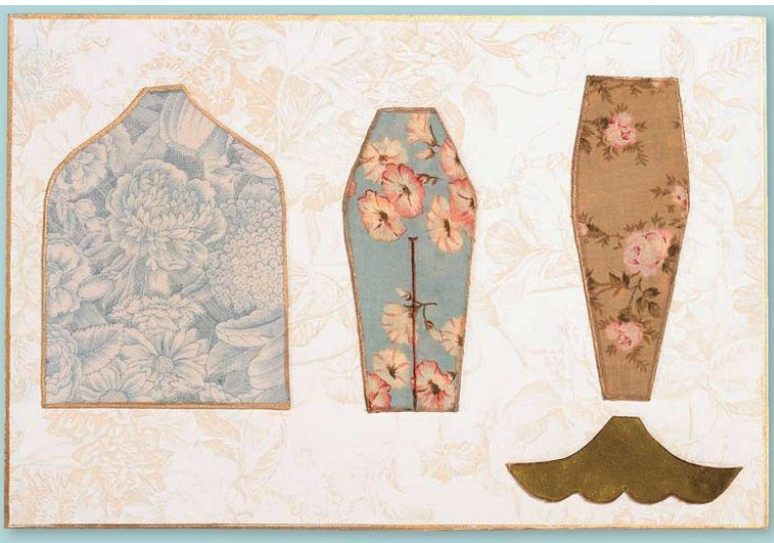
The basic pattern includes two Arm/Hand options, one with a thumb and
one without. The thumb is small and a bit fussy to sew, so you can choose to
make the hand with or without the thumb—both are lovely and delicate—
simply choose the option that is right for you.’Copy all the pattern pieces for the doll you intend to make and the feature
placement guide on page 119 onto card stock paper at your copy center. Cut
the patterns out carefully on the line to create pattern templates as explained
on page 16. Careful template cutting is essential to a good transfer. Punch
holes in the feature template guide with a ⅛″ (3 mm) punch as indicated on
the guide.
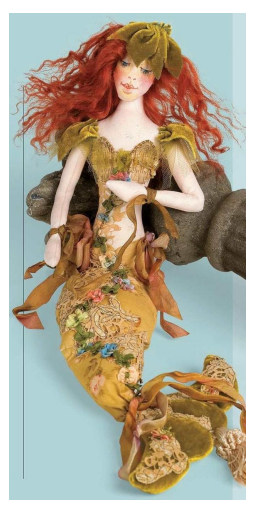
Shy by Barbara Willis
Approximate size 20″ (50.8 cm)
[I own a pattern for 20″ Bliss- with adjustments, one pattern can make many different cloth dolls]
“First, you’ll want to choose the main costume fabric, which will lead you to your ribbon choices, button selections, and embellishment options. So
spread out all your selections, and enjoy the emotion and feeling they
provide, and then get ready to play dolls!” Barbara Willis
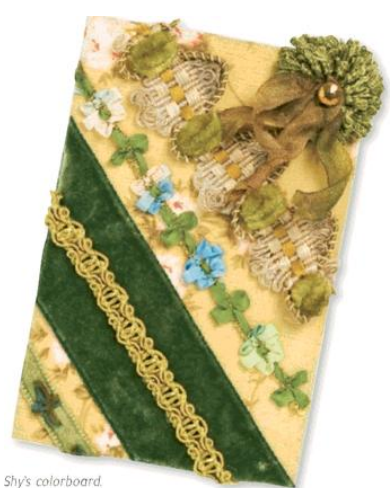
“Shy’s lace adornment is from a vintage collar, which was randomly cut
up and glued to fabric to create her clothing and tail decoration. Be creative
by mixing and matching bits of the lace and trim to cover her upper chest
and parts of her tail and fin. The chic trim on her chest is from an old
lampshade and the tassel is a piece of upholstery trim (which are the perfect
size for doll décor).” Barbara Willis
[Jacki Note: The mood boards should be framed; They are works of art, Exhibit the framed mood board next to the doll created from that collection–make several–make a series]
MATERIALS LIST for Shy
• basic doll-making supply kit (page 14)
• specific doll-making and face-painting supplies (page 15)
• ¼ yard (22.9 cm) flesh-colored fabric for face, head, arms/hands, and
torso
• 10″ (25.4 cm) square of printed green cotton fabric for tail
• 16″ × 5″ (40.6 × 12.7 cm) green velvet or other fabric for fin (save
the scraps)
• 12″ (30.5 cm) square of Peltex or equivalent
• 12″ (30.5 cm) square of HeatnBond or equivalent
• embellishment trims, tassels, glitter, beads, ribbons, and lace
• remnant green tulle
• any fiber hair
• fabric inkjet transfer sheet (for transferred face)
• tacky glue
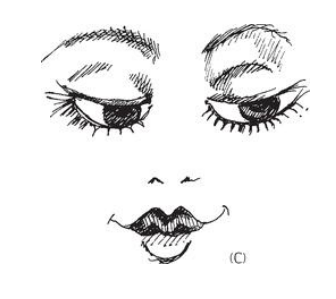
3. Make the face (pages 72-73) with a slight variation for Shy’s downcast
eyes. Notice that only the lower half of the football shape was drawn in
with black Pigma pen. With the mechanical pencil, draw a football shape
around the eye dot to create the outer line. Directly over the inked line draw
another half football shape, leaving a ″ (1.6 mm) slit between the two
lines. Go over the pencil lines with a black Pigma pen. Draw a very small
iris with blue or green gel pen off to one side in each eye as shown. (C)
4. Shade and highlight the upper eyelids with colored pencils. Shade each
side of the upper eyelid, leaving the center white to create the effect of the
rounded eyeball beneath the eyelid. Add more shading with colored pencils
or powdered eye shadows.
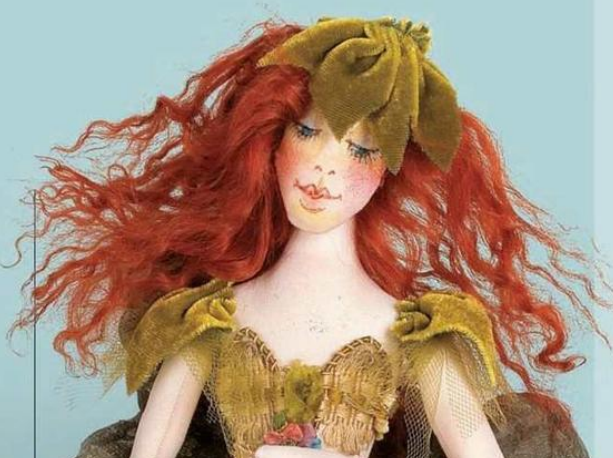
Any type of hair fiber will be lovely for the hair
(Barbara used her favorite shade of Tibetan skin for the hair and glued
small strips to cover the head [Note: I hand sew every part of my dolls. I never glue]
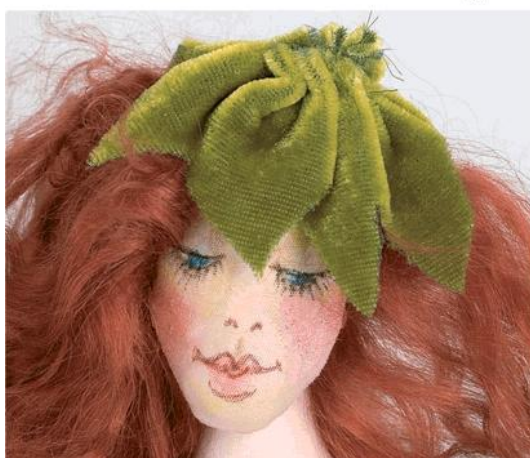
7. Make the seaweed cap by cutting a strip of leftover velvet approximately2″ × 5″ (5.1 × 12.7 cm). Sew a running stitch along one long edge and pul lthe threads to gather it tight. Knot the threads securely. Cut deep notches into the lower edge of the velvet, and glue or pin the cap to Shy’s head. (D)
8. Lots of trim and lace are used to add fun to the costume, and all are glued
securely to her with the exception of the tassel at the bottom of her fin,
which is tacked sercurely in place. Add some glitter glue to her cheeks and
body to give her a just-out-of-the-ocean look
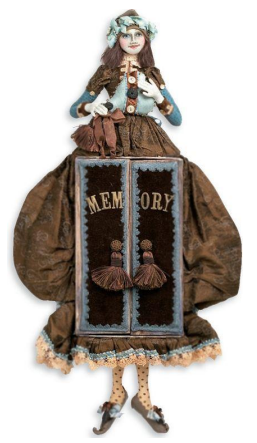
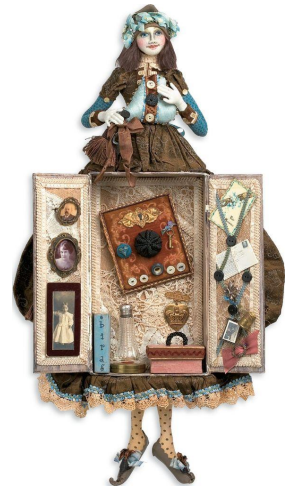
Memory Bos
MEMORY-BOX DOLL
(above)I wanted to enjoy some of the little treasures that I have tucked out
of sight in drawers and cupboards by incorporating them into a doll. I have
many lovely little reminders of life’s pleasures, such as family photos,
souvenirs from trips abroad, my aunt’s rouge pot, and a small sewing box
with my grandmother’s thimble.
So with inspiration and a goal, I removed the lid from an old cigar box,
cut the lid in half and reattached it to create a cupboard with two doors. I
then began constructing the doll; a process that I loved. I had to figure out
how to attach her dress around the box as if it really belonged there. A wee
bit of fantasy and a lot of fun went into the finished doll. I used rubber
stamps to add the design on her silk dress, created shoes with turned-up toes
and created a special heart for her to hold close.
The doll now hangs on the wall of my studio, and every time I pass her
I’m reminded of lovely times gone by.
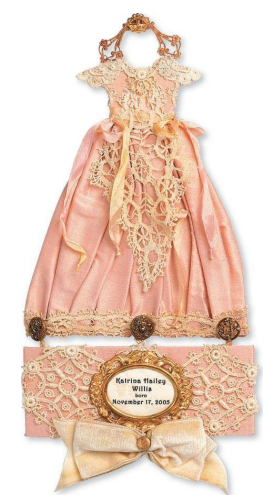
A Child Is Born
A CHILD IS BORN
(above)This lovely little announcement was inspired by the birth of my first
grandchild. Katrina Hailey came into our lives full of sugar and spice and all
things nice. I hope one day to use this doll on the cover of a memory book or
journal I plan to create for Katrina. In the meantime it’s a lovely way to
honor her birth and welcome her into the family.
I love fabric and all things pretty, so this was a perfect way to use some
special lace and ribbons I’d been saving. I used a pair of vintage-earring
findings as the hanger and connected them together with a small crown
charm. I couldn’t dream of a better way to use those special buttons I had
stashed away!]
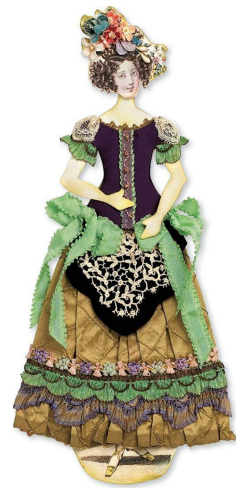
FRENCH FASHION DOLL
(above)I love French fashion images from the 1830s. I have been making a
series of these fashion mavens using bits of favorite fabrics, laces and trims.
I copied the image onto a fabric sheet using my inkjet printer, but used only
the head and feet. I then created an elongated torso and arms out of several
layers of fabric, Peltex, and decorative paper. Once I had the parts
redesigned, I got busy and played, pulling out silk fabrics, velvet ribbons,
vintage flowers, Victorian laces, and some lovely French ribbon.
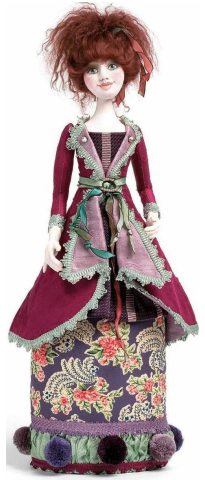
Delight is a stump doll, meaning she has no legs, but is tall enough to
look as if she might have a pair hiding under the long skirt and silk jacket. If
she had legs, I surely would have added stunning shoes!
I created Delight by first sculpting a face from polymer clay. Then I
created a mold and pressed in a paper-clay impression. When the impression
was dry, I cleaned the mask and covered it with a fine gauge knit fabric that
matched the woven fabric I intended to use for the chest and hands.
This is a doll technique I teach in one of my workshops. I think it’s always
so fun to watch the dolls and their makers as they form an unmistakable
likeness to one another—like mother like daughter, as they say.
I love that this doll is delicate, feminine, and just a Delight
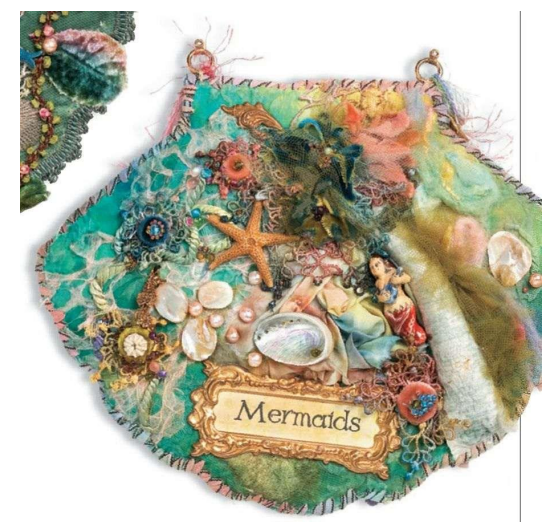
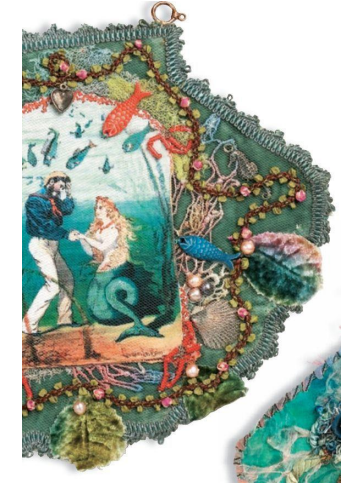
MERMAID JOURNAL
(above)I adore both vintage images and mermaid art, and I have quite a
collection of vintage mermaid images. I was very excited to get started on
this project and found it to be truly a labor of love.
I pared down the image selection to a workable few and began creating
this Mermaid Journal one page at a time. I enjoy fabric manipulation and
fiber techniques and was able to explore several of them in this journal. I
used silks, paper, fuzzy fibers, charms, buttons, fancy threads, netting, and
lovely old trims.
Discover more from Jacki Kellum
Subscribe to get the latest posts sent to your email.