I admire great dollakers, and I have made several cloth dolls, But the process of tediously stuffing tiny tubes of fabric dulls my creativity. At this point, I am eager to jump into the dolls as modes for journal pages, collages, and other dives into fabric as art. I have purchased Patti Medaris Culea’s book Creative Cloth Explorations 
Most people associate the name Jacki Kellum with her vibrant watercolor paintings. But she is also a textile artist. Like most doll makers, she has a profound connection with the human form.
“Dolls touch us in so many ways; they are an extension of the human form, a creative outlet, and a sharing of ourselves with others. A basic cloth doll can be a play doll meant for a child or it can be a simple creative outlet in cloth-doll form. My dolls seem to fall in the later category, more as a creative outlet for the inner artist.” Patti Medaris Culea
Patti Culea Star Gazer Journal Series
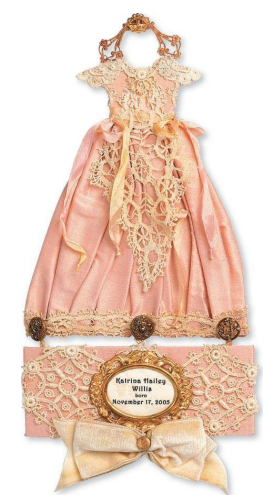
Barbara Willis A Child Is Born
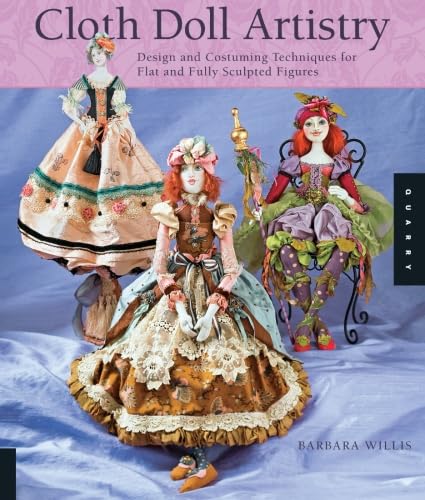
Barbara Willis’s Book Cloth Doll Artistry seems to bridge the gap between the 2-D and 3-D dolls.
The process begins with Creating a Color Board for each doll.
What Is A Color Board for a Doll?
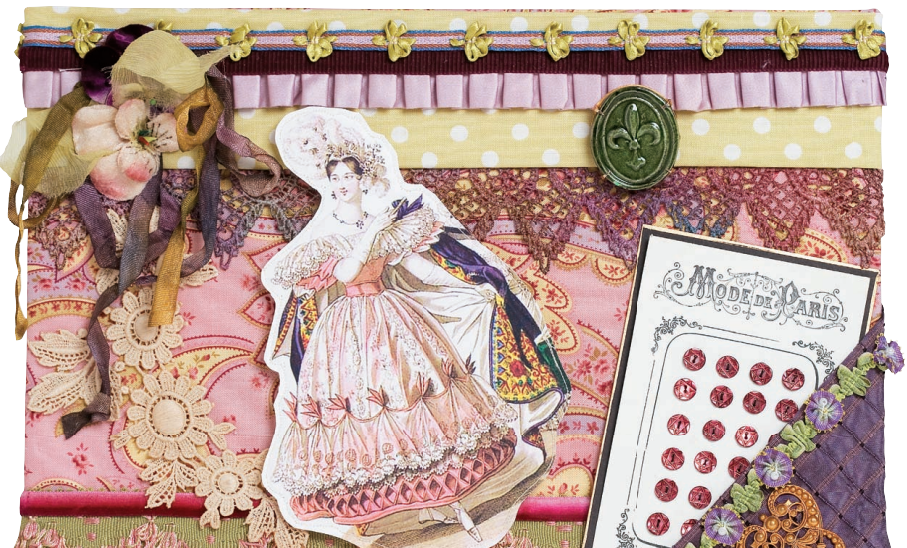
Barbara Willis Color Board for Romantic Chic
This romantic color board features a background cotton fabric with a lovely paisley print fi lled with soft colors that yield an eclectic palette. The paisley would make a wonderful base fabric for a dress or the main part of a costume. Using the colors of the paisley, I chose other fabrics to accompany
or complement the main fabric. The green polka-dot fabric would
be a great choice for legs. Notice the textured silk pocket in the lower right-hand corner. The silk has a depth of color cotton fabric doesn’t. Imagine it as a jacket or corset on the doll’s costume.
The hand-dyed lace could decorate the hem of a dress or a pair of
pantaloons. The darker green velvet at the bottom of the board adds wonderful color saturation and texture to the mix. Note how the trims are layered. While this layering is not always possible on a doll because of scale, it is interesting to see how the trims add visual interest and texture. One trim and a row of small beads may be more to scale, depending on the size of the doll.
The velvet flowers would be a fabulous accent at the waist or as
a hat. Notice how they are shown with simple, hand-dyed rayon
ribbon. The gold buttons and charms are not to scale, but you can
bring those same gold tones to your costume with small charms, gold beads, or perhaps a buckle at the doll’s waist.
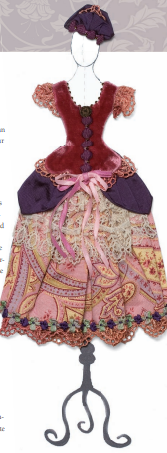
Minidress
The main fabric of the minidress is the paisley print, which is complemented by the textural rose-colored velvet bodice. The hand-dyed lace adds a dimensional element. I have
added an ecru apron with dark purple silk side fl ounces. I can visualize the green and white polka-dot legs from the color board and fancy shoes with gold buckles to complete the costume.
Keep an open mind when you are pulling out fabrics and
trims for your doll project. It’s better to start with more options
than you will ultimately need and then carefully edit and eliminate
to accomplish your goal. Once the materials are in front of you, you can have a blast mixing and matching, plotting and planning, to create.
 V
V
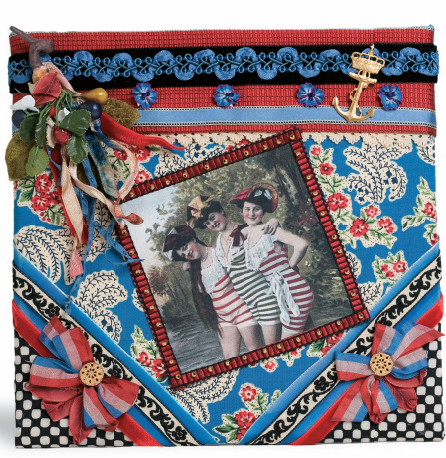
Barbara Willis Color Board for Sail Away
This patriotic board shows how to accent with black and white for contrast. The familiar red, white, and blue theme is presented in this unusual way to show how the addition of black and white polka-dot corners and scroll trim create visual interest and contrast. Black and white accents can be added to almost any
color combination for greater impact.
The fl oral print as the main fabric becomes more interesting
when it is combined with black and white polka-dot fabric. The corners of the board feature velvet and silk ribbons as well as black and white scroll trim. Repeating the red, white and blue theme in the trims and silk flowers pulls the whole combination
together. You could trim the hem or bodice of a dress with a variety of similar trims and color combinations. Gold beads sewn or fused on trim create depth and sparkle. Use this technique around the hem edge of a skirt, dress, or pantaloons. Small
ribbon fl owers make the perfect waist, hem, or shoulder accent.
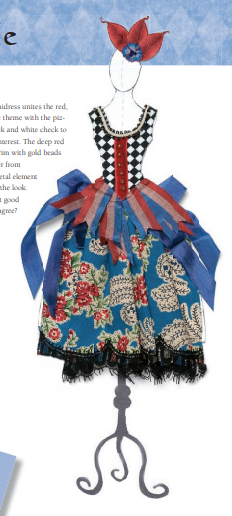
Sail Away Minidress
Minidress
The simple minidress unites the red,
white, and blue theme with the pizzazz of the black and white check to
stir up visual interest. The deep red
velvet ribbon trim with gold beads
down the center front
provides the metal element
that completes the look.
Now this is just good
fun, don’t you agree?
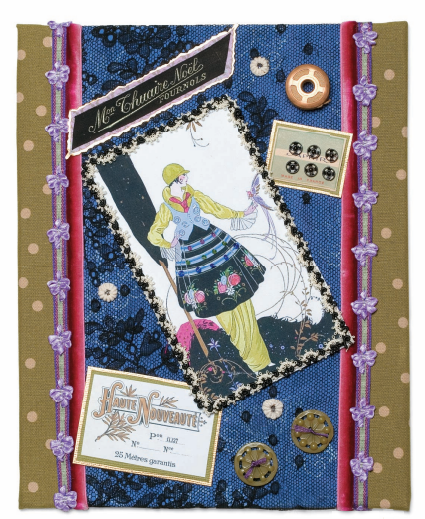
Barbara Willis Art Deco Color Board
This art deco color board illustrates
how powerful a simple color scheme
can be. The addition of black and
white adds visual interest and the
extra punch this color combination
needs for excitement. The black lace
layered over the periwinkle silk
provides texture. The green polkadot fabric adds visual variation, and
the magenta ribbon conveys color
depth and richness
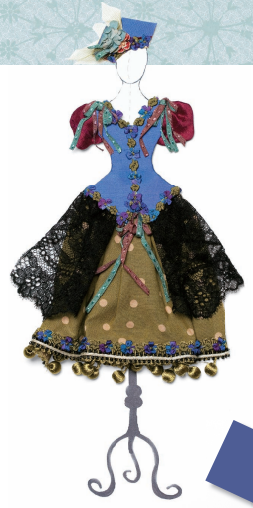
Art Deco Minidress
Minidress
On the minidress, the polka-dot
fabric is used as the main costume
fabric because the eye is drawn to the
simple but noticeable polka-dot pattern. The solid periwinkle and burgundy silks complement the mossy
green of the main fabric. The black
lace enhances the simple color
choices. Delicate trims follow the
hemline and bodice for an extra
visual treat. Mixing cotton with the
laces and silks makes an exciting and
varied color and textural presentation. I want a dress just like this one!
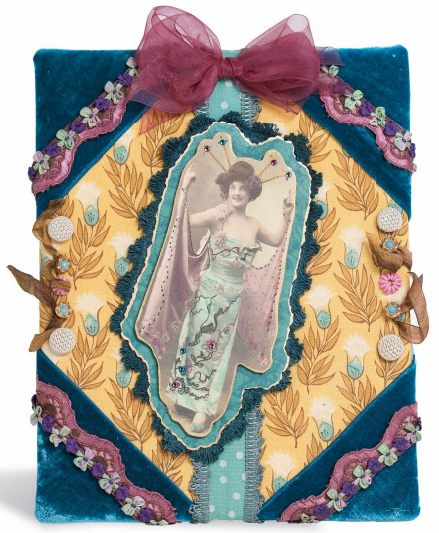
Barbara Willis Color Board – Simply Elegant
This color board exudes elegance.
The rose-colored French trim complements the main fabric selection, which is a simple cotton print with limited color variation, and provides welcome visual excitement. Velvet
corners add depth and color saturation. Heat-set crystals add shimmer and sparkle. Using several shades of your central colors creates depth.
Although the main fabric is simple in its color focus, it doesn’t inhibit creative possibilities for a doll costume.
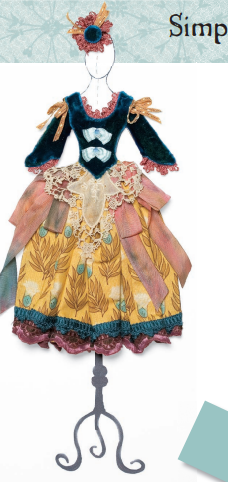
Minidress
This minidress is made from the main yellow print fabric. The bodice is made of the turquoise velvet, the hem is accented with two layers of trim for an elegant feeling. The hand-dyed ribbon at the hips provides color variation as well as visual interest, as one color bleeds into the other. Maybe you can imagine deep
mushroom-colored silk legs and rose colored shoes, accented with sparkled crystals.
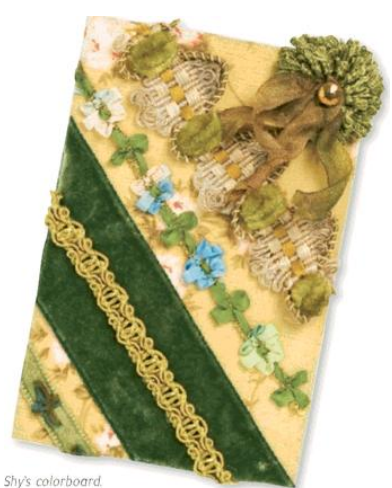
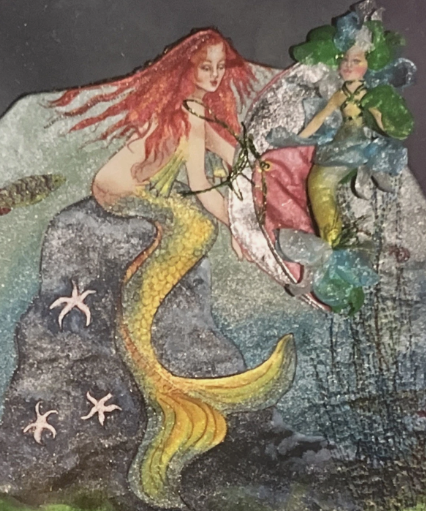
Barbara Willis Color Board for Her Mermaid Doll Shy

Color Board
By Elinor Peace Bailey
“A complex display of fabric that leaves you breathless is what we’re looking for here.
Because the doll form lends itself to a painterly layering of color and texture, it is a grand home for excess—so I play with ruffles and flourishes, layers and transparencies, tiny details, and overall appearance. I never tire of seeing a completed form
that has been spared nothing. To withhold some treasure will kill the piece. If using what you have is an excuse rather than a bragging point, then get better stuff! Like a magpie, collect what delights your eye from thrift stores, garage sales, quilt shops,
and craft stores. A doll is a small object; she can hold a bit of the best.
I start with a complex color palette drawn from what I call a mother print, a main print from which everything else departs. I hope to find at least twelve colors in the mother print in order to have the greatest number of possibilities. Then I begin looking for things that sing when they are with that piece of fabric. I add until I am sated. Now, all of that pile might not be part of the fi nished
piece, but it is all there for the audition. In this instance, I
started with a vivid stripe and then grabbed as many textures as I could in about fi ve minutes. I allow very little pondering time. Now, if you will excuse me, I am off to make a doll!” elinor peace bailey
Color Board
By Patti Medaris Culea
Supposedly, eight percent of all men are colorblind, while just two percent of all women have that visual impairment. Perhaps this explains why guys sometimes don’t appreciate the outfits that we think look spectacular.
I’m forever grateful that I’m among the 98 percent of women who identify colors. However, for me, it’s much more than recognizing. I positively thrive on colors—especially yellows, pinks, greens, black, and white, which are those I work with the most. They are what I call my happy colors, and they brighten my day.
When I design a doll, the color of something as small as a scrap of
fabric, a bead, or a piece of trim can greatly infl uence the fi nished creation.
I’ll see a new or unusual fabric and suddenly a doll will come to mind. I don’t have a traditional color board in my head. For instance, I recently bought two fabrics. One had a yellow background with subtle polka dots n gold, while the other had pink, aqua, and black and white checks. The latter was used to create a new version of my Banbury Cross Beth doll pattern. She’s at the center of the color board holding a book she’s about to read. Butterfl ies were appliquéd along the border, and a beautiful white trim was added and then embellished with sequins and beads.
Mixing patterns is a fun approach. Forget the old rule to avoid clashing designs. I sometimes combine checks, stripes, polka dots, and a fl ower print to create a memorable doll. I then add lace, trim, and beadwork to complete my new friend.” Pattl Medaris Culea
“…keep in mind that the treasure hunt for ideas and materials is as much fun as the designing. Building a worthy stash of fabrics, notions, and trims to pull from is a delightful part of cloth doll making. If you are wondering if your doll will have the right trims, the answer is yes—because you pick what you like—the colors, textures, and styles that draw you in. Local craft stores, scrapbook stores, and fabric shops have heaps of stuff just waiting to go home with you. If you love vintage, then flea markets, garage sales, and thrift stores should be the focus of your gathering.” Barbara Willis
Barbara Willis – Cloth Doll Maker – A Tribute to Doll Makers Who Have Fostered My Creativity

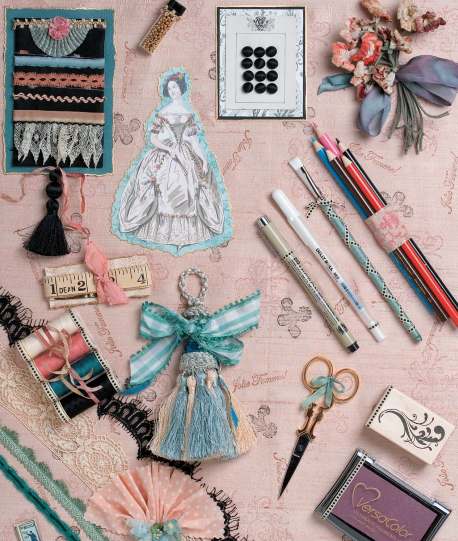
Tools
Every art or craft requires tools. These are the tools I consider essential when I embark on any new doll project.”Barbara Willis
• Purple fade-away marker (A)
Marks from this magic pen disappear completely. The color doesn’t migrate to other parts of the doll. I learned a long time ago that the purple fade away markers are the best
ones to use for cloth dolls. I generally
use them to trace the torso, upper
arms, and legs. I always use them on
the faces to mark feature placement
and to make the adjustment lines on
the hands and fi ngers. Although the
ink may take as much as a few days
to fade away, it does eventually
disappear.
I prefer to use the larger-tip
marker rather than the fi ne-tip
because it gives me a better mark and
lines that generally last until I no
longer need them.
Marking made with blue-ink
water-soluble pens must be removed
with water. When combined with
fi berfi ll, the ink will migrate to portions of your doll’s face, legs, and arms that you do not want when it
dries. Even though you water away
the marks on the nose, when the
fabric dries you might fi nd marks on
the lips or cheek. This can last for several applications of water. I fi nd this
too frustrating and risky on the face
because the water might make some
inks run or leave stains over the powdered eye shadows and blushes used
for facial coloration.
• John James long darner #7nneedles (B) abreeze. The needle is slim enough that it doesn’t create holes in the fabric, flexib
These needles or an equivalent will make your softc sulptingle enough to move but retain its shape, and long enough to pass through all of my doll sculpting projects.
• Jointing needles (C)
I prefer using 7″ (17.8 cm) needles to string joint my dolls, but a 5″ (12.7 cm) one will do as well. Keep two needles on hand if your doll is string jointed.
• Small, sharp-point scissors (D)
• Hemostats (E)
These come in several sizes and types, with curved and straight tips. I prefer the straight tip ones and am inclined to have at least two sizes near me when I am making my dolls; a medium pair with a pointed tip for fingers and small areas, and a larger pair for
stuffing wads of fi ber fi ll into the doll parts.
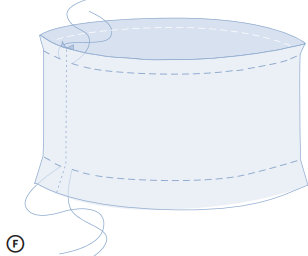
• Brass turning tubes and steel rods for fi nger turning (F)
for cloth doll makers and usually come in a packet with three or four sizes of tubes in them. I
create my own from small brass tubing, 1⁄8″ (3 mm) and one size smaller 3
⁄32″ (2.4 mm) along with a small steel rod that will fi t with a margin of ease into each tube. This type of tubing, and the steel rod is usually available at a hardware or hobby store.
• Mini and Regular Stuffi ng Forks (G)
Available at several cloth doll
making suppliers this is a must
for stuffi ng your dolls. The mini
is used primarily for the fi ngers,
while the regular size is used for
main cavities and limbs of the
doll. Used in conjunction with
the hemostats, your success is
built in!
• Hole punch (H)
Have regular hole punches at your
fi nger tips when you need to punch
a hole in your project. But, if you
are in the mood to treat yourself,
a Japanese screw punch will make
short work through several layers
and cuts clean every time
Flat dolls open the door to creative expression. They offer an enticing and accessible approach to cloth doll making. Unlike their close relative, the paper doll, flat cloth dolls include the tactile element that only fi bers provide. Fabric makes us want to touch as part of the experience. Our eyes tell us one thing, but our hands
tell us another.
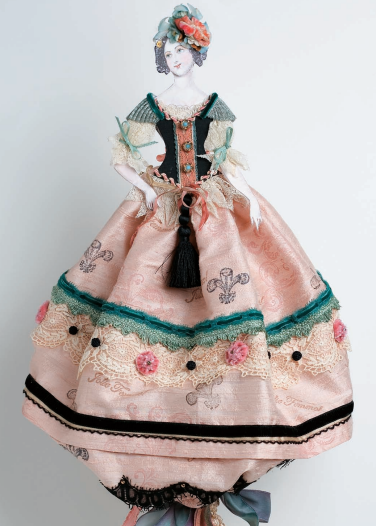
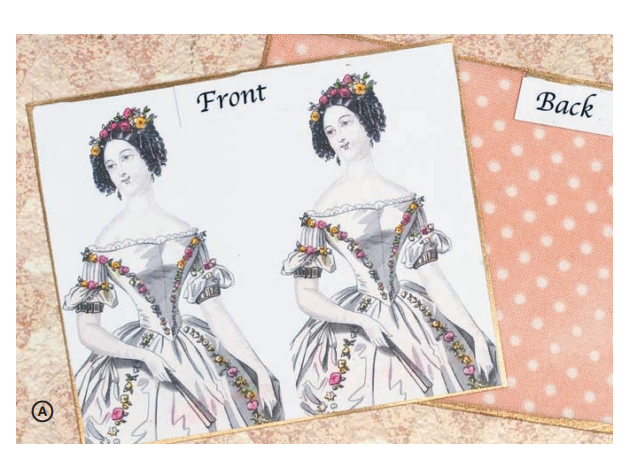
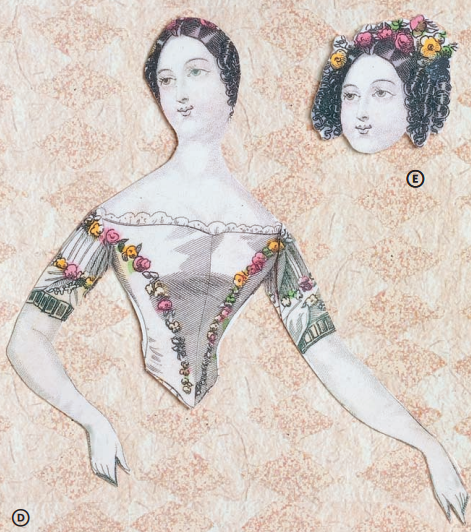
Gabriella – A Barbara Willis 2-D Doll
Early fashion plates from the
1700s through the 1800s are the
inspiration for my fl at cloth doll art.
European fashion houses employed
artists to bring life to the couture
designer’s creations. These lovely
illustrations were published in
magazines for refi ned ladies so they
could learn about current fashions.
The images offer inspiration for both
vintage and new textiles. Here, a vintage fi gure from the early 1800s is
used as the model for Gabriella.
Combining vintage images, laces,
ribbons, trims, and buttons with vintage textiles offers eclectic choices for
designing art dolls. This approach
offers a second debut for all things
vintage, making old things new and
new things old.
Endless exciting materials are
available to experiment with and
explore. Beautiful fabrics, but also
fabulous rubber stamps, metal
charms, metallic threads, bonded
fi ber papers that act like fabric, gold
leafi ng pens, fi ber dyes, and fabric
sheets that run through ink-jet printers await our creative touch.
Although some of the techniques
used here are not in themselves innovative, they are all exciting, creative, and artistic. Anything is new if you
have never done it before.
Materials for Gabriella
MATERIALS
• 1–2 colorfast fabric ink-jet sheets in cream or white
• ½ yard (30.5 cm) dupioni silk for skirt
• ¼ yard (22.9 cm) coordinating small-print, cotton
fabric for the backing
• small piece of black silk for the corset
• trims, beads, assorted silk fl owers for skirt and headdress
• lace for sleeves and corset trim
• small trims and ribbon for the upper corset and sleeves
• small buttons and beads
• silk fl owers and/or velvet leaves
• medium tassel for bottom of the dress
• small tassel for bottom of the corset
• ½ yard (45.7 cm) narrow cord
• small piece of fusible stabilizer, such as Timtex or Peltex
• heavyweight iron-on fusible web, such as HeatnBond
• matching threads
• heavy nylon upholstery thread
• tacky glue
• spray art fi xative, such as Krylon
• aqua, dark gray, lavender, peach, and rose colored pencils
• white gel pen
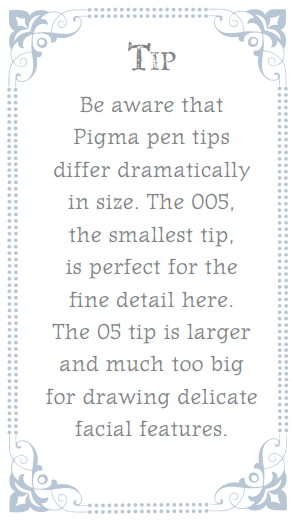
• black Pigma pen, 005 tip, such as Sakura Micron Pig
• rubber stamps
• pigment or fabric stamp pads
• 1–3 pieces of ½-yard (30.5 cm) cuts of ½–1″ (1.3–2.5 cm)
ribbon to embellish tassel
Tools
TOOLS
• ink-jet printer
• sewing machine
• fl at, stiff brush, ½” (1.3 cm) wide, with fairly short bristles
• 9″ × 12″ (22.9 x 30.5 cm) piece of poster board
• wooden craft stick
• iron
• straight pins
• hand needle
• small pair of sharp fi ne-tip fabric scissors
• paper scissors
• measuring tape
• clear ruler or hem gauge
• tape
• purple fade-away marking pen
• small hole punch
Getting Started
Read the instructions completely before you start. This will get your creative juices
fl owing, help you plan your project, and give you a sense of order.
When using an existing illustration, like we are using here, keep in mind that it might
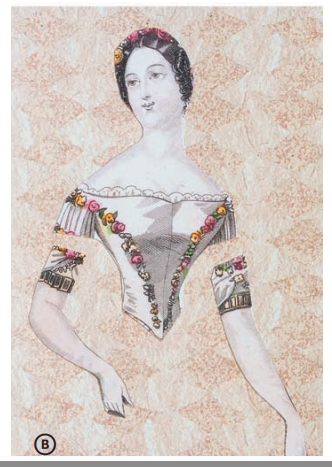
need adjustment to suit your personal vision. I have made a few changes to the pose by
cutting and repositioning the arms and cutting off the skirt. I also enlarged the image to make it easier for you to work with.
Creating the
Paper Torso
1 Make a good color copy of the double
image found on page 111 using a color
copy machine.
2 Adjust the color of your ink-jet printer
as necessary so you can transfer the
image onto fabric. Load the paper
tray with a colorfast fabric sheet and
make one copy of the double image.
Follow the manufacturer’s instructions to heat-set the color on the
colorfast fabric sheet.
3 Turn over the double image and
fuse a piece of iron-on fusible web
to cover the entire back. Remove
the paper backing and fuse a piece
of poster board onto the back of
the images. Fuse a second piece of
iron-on fusible web to the blank side
of the poster board.
4 Cut out an 8½” × 11″ (21.6 × 27.9 cm)
piece of small-print cotton fabric.
Remove the paper backing from the
back of the poster board and fuse the
fabric to the board. The poster board
will be sandwiched between the
images on one side and the smallprint fabric on the other (A)
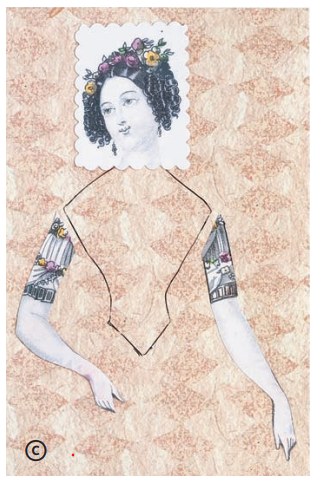
6 On the second image, cut the arms
off at an angle as shown. Cut out the
arms and hands carefully. Trim away
the ruffl ed part of the sleeve. Loosely
cut away the head so it forms a
square block (C).
7 Apply tacky glue along the upper
sleeve area of the fi rst image. Position
the angled cut arms on top of the
glue and away from the body a bit.
This allows room to place the skirt
around the waist area later. Let the
glue set (D).
8 Cut out a small block of Timtex and
glue it to the back of the square head
image. Cut out the same size square
of the small-print fabric and glue it to
the back of the Timtex on the head.
9 Use a gray pencil to lightly defi ne the
chin and jaw line on the front of the
image and create a cutting line. The
chin is not shaded well on the image,
so your line will determine the actual
chin and jaw line (E).
10 Carefully cut out the head image
around the hair, fl owers, and chin
and jaw line. This is the face you will
color. Dab the cut edges with tacky
glue to keep them from fraying. Let
the glue dry
11 Cut the wooden craft stick to 3–4″
(7.6–10.2 cm) long. Apply glue to one
side of the stick and place it on the
back of the doll from the head to the
lower spine to reinforce her neck.
12 Cut a strip of the small-print cotton
fabric and glue it in place to cover
the stick. You can reinforce the arms
the same way, if you like
Detailing the
Facial Features and
Finishing the Head
1 Blush the cheeks to a rosy glow with
colored pencils. I applied the colored
pencil and then softened the color
with a fl at, stiff brush.
2 Color the eyelids with a soft colored
pencil in lavender, aqua, or peach.
3 Enhance the outline of the eyes with
the 005 tip black Pigma pen
4 Enhance the whites of the eyes with
the white gel pen.
5 Color in the lips with a colored pencil.
6 Spray fi xative to set the color. Let it
dry. (It’s best to do this outside.)
7 Apply glue to the back of the painted
head. Press the head in place over the
other head. This second head will add
depth and create visual interest.
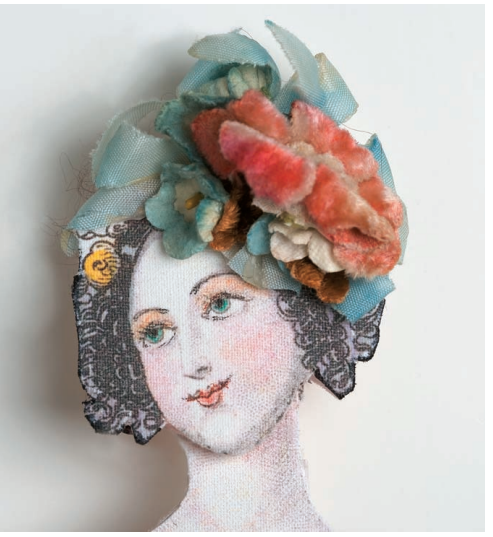
8 Glue silk fl owers to the head to create
the headdress.
Creating the Skirt
1 Measure and cut a 14″ × 36–40″
(35.6 × 91.4–101.6 cm) piece of
pastel silk dupioni. Lay out the silk on
a clean fl at surface, right side up.
2 Create texture and visual pattern
interest on the fabric with rubber
stamps and pigment stamp pads. Use
more than one stamp style and more
than one color stamp pad. Apply the
stamping in a random pattern.
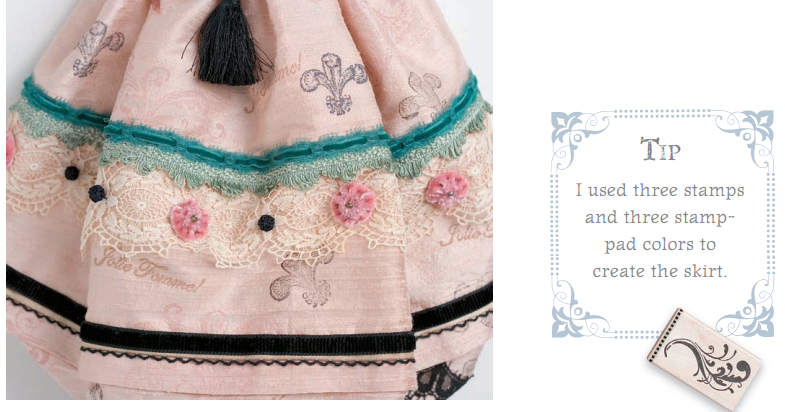
3 Heat-set the stamping with a dry iron.
4 Measure and mark the placement
of the trims you selected with
a measuring tape or hem gauge
and a purple fade-away marking pen.
Discover more from Jacki Kellum
Subscribe to get the latest posts sent to your email.