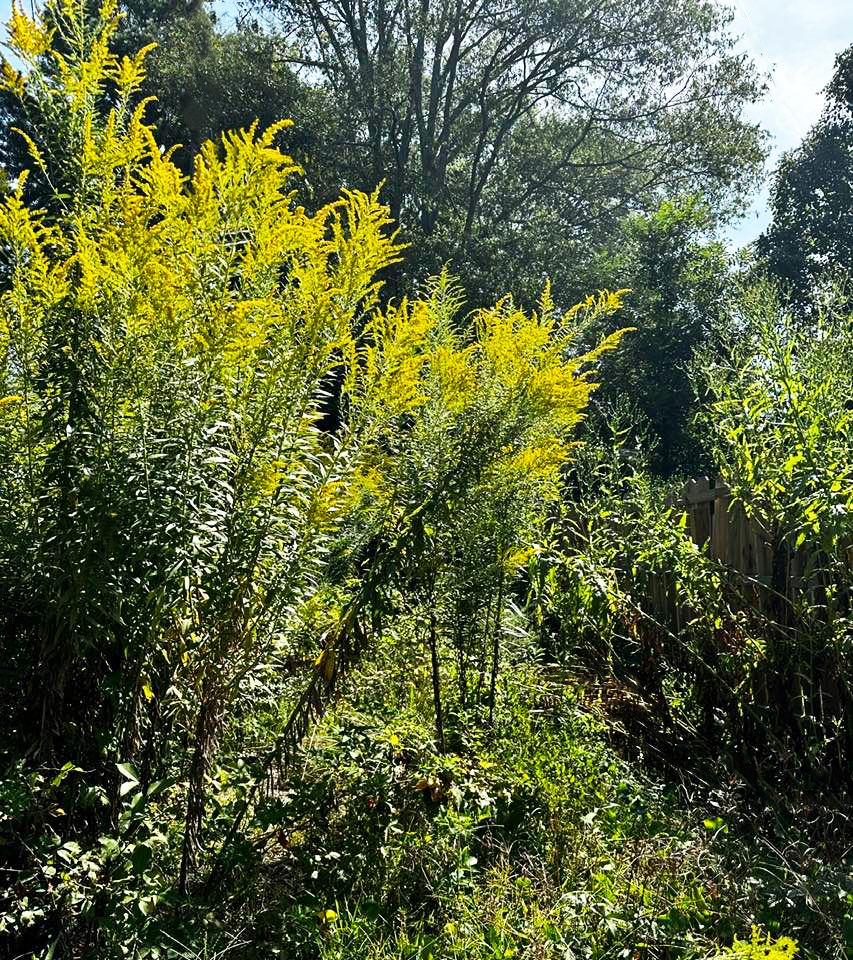
For many years, I have wanted to have access to a large stand of goldenrod, and finally, I have that this year–standing at the back of my yard. I must confess that this delightful patch of goldenrod is not actually mine, Rather, it is at the back of a vacant lot next to my yard. The owner of the lot cleared the area earlier in the year, and fortunately, she has let the area go.
In truth, I take some credit for the fact that the stand of Goldenrod has been allowed to thrive. Soon after I moved into my house, I noticed that small goldenrod plants had begun growing. One day, she saw me outside adoring the baby plants, and I suppose that she thought I was being critical. She said that she would get someone to clear the area of weeds soon, and I begged her, “Please don’t.” I explained that this would soon be a gorgeously golden spot and that all sorts of creatures needed for her to allow her weeds to grow.
After that, I sort of adopted this area, and I have lathered over it for months, as I have watched it move toward September, when I knew that I’d see what I saw today:

Among other things, I want to dye some natural cotton with the goldenrod, and here are the instructions for how to do that:
“Did you know that you can dye fabric with goldenrod to create a beautiful yellow color? It’s easier than you might think! Here’s a super straightforward method for dyeing with goldenrod, that gives delightful results!
goldendenrod for dyeing cotton
“As I’m writing this, snow is swiftly accumulating outside, and the freight-train howl of a proper Nor’easter is clamoring at the windows. Warm autumn afternoons and armfuls of goldenrod seem a distant memory, so it’s hard to believe that just weeks ago I was using those sunny blossoms to dye fabric in my kitchen.
“Life spins on so quickly! Even though the onset of wintery weather might mean that most of us won’t be dyeing anything with goldenrod again this season, I wanted to go ahead and write this post anyway, so I’ll have my notes handy for next year.
“Dyeing with goldenrod really is a perfect introduction to dyeing with herbs, since it’s surprisingly easy, and the results are so satisfying. …
“I recommend gathering an amount of goldenrod blossoms that’s roughly equal to the amount of fabric you want to dye.

Image Credit – Salt in My Coffee
“We snipped off all the flower fronds for our dye bath, and discarded the tall, woody plant stalks. In the process, my sweet little gentle-heart tried her very best to make sure that every last bug escaped, before ending up in a boiling caldron! (She’s pointing out one more teensy beetle in this picture.

Image Credit – Salt in My Coffee
Mordant the fabric
“For this project, I used 100% cotton fabric. You can also use this method for dyeing wool.
“I simmered my cloth with 1T of potassium aluminum sulfate (this pickling alum that’s available right in the grocery store) to “mordant” it, which simply means preparing the fabric to be able to accept the dye color.
“To accomplish this, I put my fabric in a big soup pan, then covered it with enough water to be able to stir and swish around freely. I added the alum and gave it a good stir to make sure the alum was well dissolved and mixed evenly throughout the pot. Then I let the whole thing come to a very gentle simmer, and kept it barely simmering while I boiled the goldenrod blossoms to create the dye bath – about 40 minutes.
“I had great results using this inexpensive, easily available alum. However, it’s worth mentioning that from reading this excellent page about mordanting fabrics, and also this one, my understanding is that using aluminum acetate instead of potassium aluminum may give a brighter color when working with a plant based fiber like cotton. It’s harder to find though, and rather expensive, so as a playful hobbyist rather than a serious craftsman at this stage, I’m not putting it high on my shopping list. If I do give it go, I’ll be sure to come back and update with my results!

Image Credit – Salt in My Coffee
“As soon as I had my fabric simmering with the alum, I got my dye pot boiling.
“To do this, I crammed all those blossoms into my big aluminum pressure canner. I felt the extra aluminum of the canner could only help the dyeing process.
“I filled the canner with plenty of water to cover the blossoms, and brought it all to a boil. A wooden spoon came in handy to keep stirring and pushing the blossoms under water until they were well “water-logged” and stayed submerged on their own.
This pot, I kept at a hearty simmer or gentle boil for a full 40 minutes, creating a goldenrod dye bath
“Next, you’ll need to remove the plant matter from your dye bath. I have a large slotted spoon that worked very well to remove the bulk of the plant matter. Then I simply poured the the remaining liquid through a large sieve to remove any last bits, and returned the dye bath to the aluminum pressure canner pot.
Add the cloth, and simmer
“Once you’ve got your dye bath strained, go ahead and add the wet fabric. No need to rinse or wring out the fabric – I just used a wooden spoon to scoop the fabric out of the mordant pot, and into the dye bath.
“Simmer gently for another 45-60 min. The fabric in these photos was simmered for exactly 45 minutes, then allowed to cool while continuing to sit in the dye bath. For a slightly more vivid color, I might try simmering it for an extra 15 minutes next time.

Rinse fabric in cool water until water runs clear.
“I let allowed my cloth stay in the dye bath til it was mostly cool, which makes it much easier to work with than piping hot right off the stove.
“Rinse the fabric very well in cool water, until water runs clear. This is a bit of an exercise in patience, since you’ll be surprise how much yellow just keeps rinsing out! It’s also a bit nerve wracking, since you’ll have fallen so in love with the color of your fabric, as it’s been simmering quietly in that dye bath, that you may feel a bit desperate at the thought of all that yellow washing out!
“I will get lighter than it looks right out of the dye bath, but it’s still going to be beautiful!
“Once the water starts rinsing through clear, you can gently squeeze (but don’t wring!) your fabric, and lay or
hang it to dry.

Image Credit – Salt in My Coffee
This is a completely un-edited photo of the finished fabric below, and I’m really pleased with the color!
dyeing fabric with goldenrod and alum
“In behind the yellow fabric, you’ll see a dull brownish cloth. Can you believe that this “medieval peasant garb” colored cloth was also dyed in goldenrod? It was! However, I didn’t mordant the fabric, and instead of boiling the blossoms in an aluminum pot, I boiled them in an iron one. I used the same volume of blossoms to fabric, and simmered the fabric in their dye baths for the same amount of time. Isn’t it amazing what a simple change of chemicals can do, when working with natural dye?
“If you’ve been wanting to try your hand at dyeing with plants, I hope this post can help give you a little nudge to jump in and try it! It’s fun, rewarding, and addictive! Have you tried dyeing with goldenrod? I’d love to hear about it! If you’re looking for a plant dye that gives a deeper golden color, you may like to try dyeing with Devil’s Beggartick.”
Anna. “Dyeing With Goldenrod.” Salt in My Coffee, Aug. 2021, saltinmycoffee.com/dyeing-with-goldenrod.
Can you dry goldenrod to use for dye?
“The short answer is no. Drying goldenrod renders it useless for dyeing. If you try to dye with dried goldenrod, it gives a very light muddy brown–not the sunny yellow that we get from fresh blossoms.” Ana
Preserving goldenrod for dyeing
Method 1: Freezing the blossoms in water
“This is the quickest and easiest way to stash goldenrod away for later use. Simply get a big freezer bag, and stuff it full of goldenrod blossoms while they’re at their peak.
“(It’s ok to really cram those blossoms in there! Just leave room for them to get fully covered with water.)
“Then fill the bag with water so the blossoms are fully covered, zip it shut (might find it helpful to do this over a sink!), and put it in the freezer to work with later.
“When you’re ready to dye with the goldenrod, go ahead and use the water it was frozen in as part of your water for the dye bath.
Method 2: Prepare the dye bath now, then freeze it for later
“This works well also! If do you have time to prepare the dye bath now, but aren’t ready to work with it, you can actually freeze the dye bath with good results.
“I’ve been asked WHY anyone would bother with this. If they have time to make the dye bath, why not just use it now?
“There are a few reasons you might want to do this! If, for example, you don’t have on hand the materials that you want to dye (e.g. maybe your alpaca yarn isn’t back from the mill yet), this would be a situation where you might want to delay using a prepared dye bath.
“Or perhaps you’re planning to keep materials in the dye bath for a couple of days and don’t have time for that right now. There are definitely situations where freezing a dye bath can come in handy, and the good news is, it works.
“Go ahead and pour the dye bath into freezer bags, or freezer-proof mason jars (don’t forget to under-fill them so they can expand). Then freeze until you’re ready to work with it.
“When you’re ready, thaw the dye bath and use it as normal.
“I personally feel that previously frozen dye bath takes slightly longer to set color, than dye bath that hasn’t been frozen, but there are always variations from one batch of dye to another anyway, so I don’t have a hard or fast rule on this.
“I generally err on the side of long dye times, and especially for goldenrod (a dye stuff that’s not a paragon of lightfastness), I find that allowing extended dye times, and fully drying the dyed fiber before rinsing, helps to drastically increase the longevity of color in the finished product.
Anna. “Can You Dry Goldenrod for Dyeing?” Salt in My Coffee, July 2023, saltinmycoffee.com/can-you-dry-goldenrod-for-dyeing.
Image Credit: Vibrant Acres
Discover more from Jacki Kellum
Subscribe to get the latest posts sent to your email.