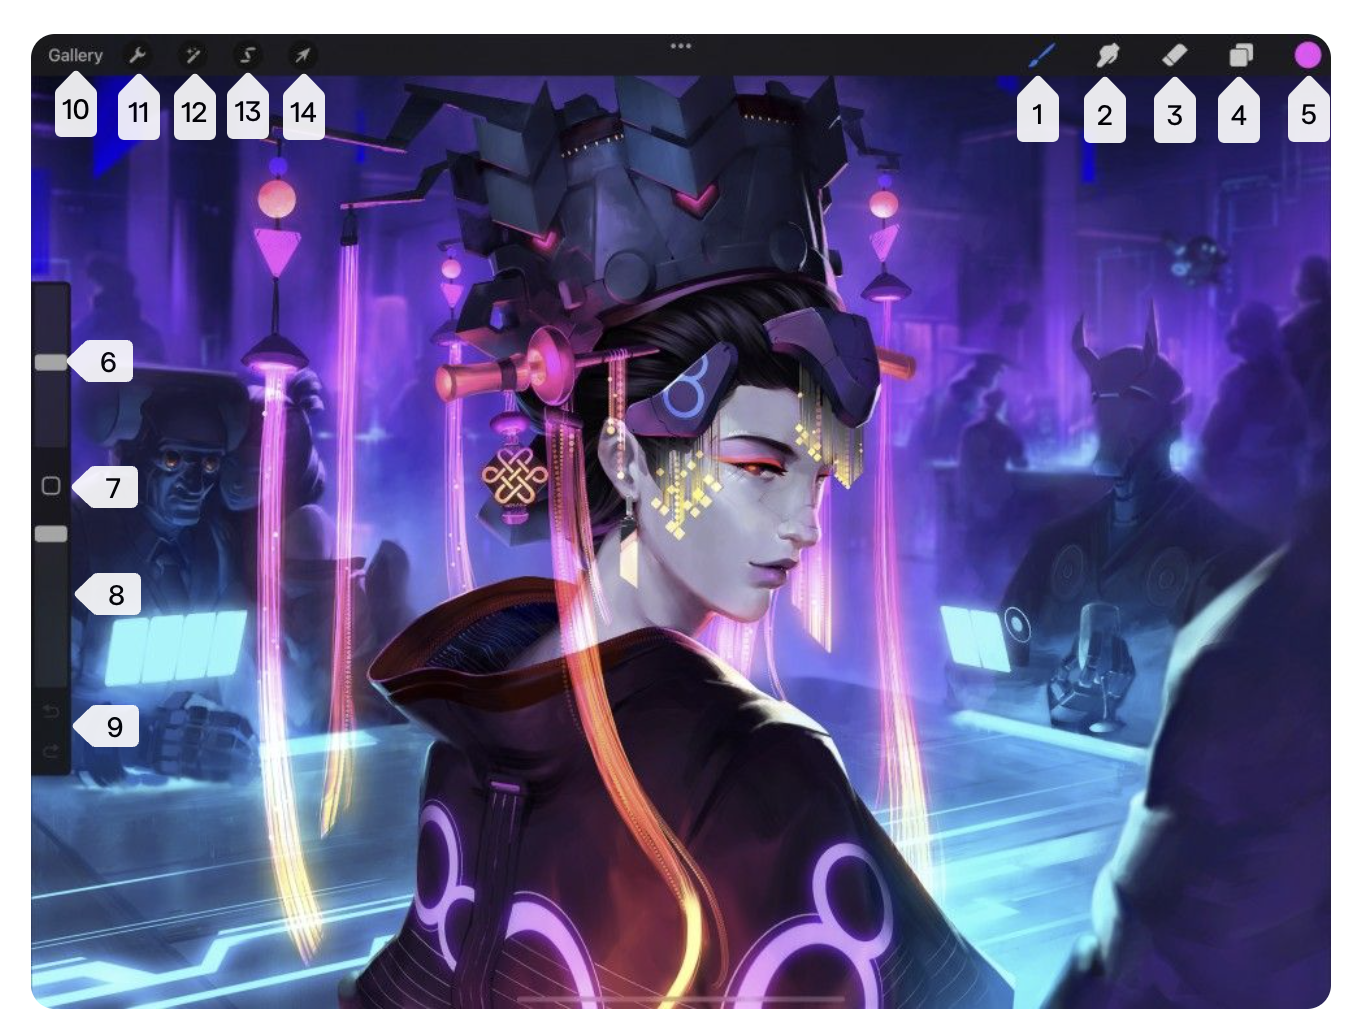
The Most Obvious Way to Alter an Image in Procreate is the Eraser Tool–Which is on the Upper Right Menu.
The Procreate Eraser Tool Works Like an Eraser on a Traditional Pencil — It Erases!
The Procreate Eraser Tool Is Located in the Upper Left Menu:

On the image above, the eraser tool is labeled 3.

Paint away mistakes, remove pigment, carve out areas of transparency, and soften your artwork.
Erase to remove pigment from your canvas.
Tap Erase then select a brush from the Brush Library. Tap or drag your finger over your brushstrokes and colors tone either erase or blend your artwork.
The Opacity and Other Brush Modification Tool Are Located in the Sidebar.

Sidebar (left side)
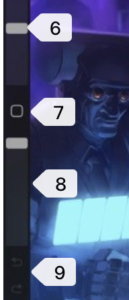
The modification tools are all accessible on the left sidebar. Use the sidebar to adjust your brush sizes and opacity. Plus access Undo, Redo and the Modify button with your free hand while you work.
Brush size Labeled 6
Increase the size of your brush tip for a thicker stroke by dragging the top slider [on the left side] up to. Make a smaller brush tip and achieve a thinner line by dragging the top slider down.
Brush opacity Labeled 8
To increase or decrease your brush opacity from transparent to solid, drag the bottom slider up or down. To more accurate opacity changes, hold the slider and drag your finger sideways. Without lifting your finger, drag up or down. Notice that the slider now moves in smaller increments.
Undo / Redo arrows Labeled 9
Tap the top arrow to Undo the last thing you did. Tap the bottom arrow to Redo it. A notification will appear at the top of the interface to let you know which action your Undo or Redo affected. You can Undo up to 250 actions.
Tap and hold either arrow to rapidly Undo/Redo multiple actions.
Adust Your Procreate Image via the Adjustments Menu–Located on the Upper Left Bar:

Image Credit: Procreate Handbook
Adjustments Button
In the top menu bar you’ll find a magic wand symbol. This is the Adjustments icon.
Tap it to open the Adjustments menu.
Image Credit: Procreate Handbook
Filters & Ajustments Located in Procreate Adjustments Menu
 Image Credit: Procreate Handbook
1. Gaussian Blur
Smooth and soften your image.
Give your image a soft, out-of-focus look. Drag your finger right or left to apply an even blur to your current layer.
Learn more about Blur .
Create the illusion of fast movement.
Create the appearance of speed and motion by applying a streaky blur to your layer in the direction you drag your finger.
Learn more about Blur .
Create zooming and blasting effects.
Drag a disc into place to set the center point, and drag outside it to create a blur. The Positional setting radiates a blur in every direction from the center point. The Directional setting blurs in a single direction.
Learn more about Blur .
Add grain to your image for the organic feel of old film stock or newsprint.
Increase or decrease the graininess of your image by dragging your finger right or left. Choose from three different types of Noise — Clouds, Billows and Ridges. Adjust the Scale, Octave and Turbulence to control how your Noise appears.
Learn more about Noise .
Bring out the detail in your image for a crisp, focused look.
Drag your finger left or right to set the level of sharpening you apply to your image.
Learn more about Sharpen .
Create the illusion of glowing light.
Create realistic looking lighting effects to an isolated object or across an entire image. Adjust the Transition, Size and Burn to control how your Bloom appears.
Learn more about Bloom .
Add analogue and digital video inspired glitches and distortion to your artwork.
Add four different types of digital Glitch effects — Artifact, Wave, Signal and Diverge. Adjust how they interact with your artwork using individual controls for each effect.
Learn more about Glitch .
Create a retro color magazine or newspaper halftone print effect.
Choose from Full Color, Screen Print or Newspaper, and control the halftone pattern size.
Learn more about Halftone .
Shift the red and blue plane of a RGB image to mimic a camera lens’ Chromatic Aberration effect.
Apply Chromatic Aberration radially from a focal point using Perspective. Or apply horizontally and vertically using Displacement mode.
Learn more about Chromatic Aberration .
Morph the pixels in your layer to create a variety of mind-bending warp effects.
Use extraordinary Liquify effects on your image with the touch of a finger. Select from Push, Twirl, Pinch, Expand, Crystals, and Edge modes. Control the Size, Distortion, Pressure and Momentum of the effect and adjust the amount to reconstruct your image.
Learn more about Liquify .
Paint one part of an image onto another part for quick and natural duplication. Or, instantaneously replace one part of an image with another part.
Position a disc over the part of the image you want to duplicate, and paint where you want the new copy to appear.
Learn more about Clone .
Image Credit: Procreate Handbook
Discover more from Jacki Kellum
Subscribe to get the latest posts sent to your email.