Before I show you how to create a new picture with photoshop, I’d like to tell you something about myself
 .My name is Jacki Kellum, and I write and illustrate picture books. I am excited that one of my picture books will be published soon. Before now, I have used watercolor paint to create my illustrations, but I have begun creating a new picture book and drawing workbook series, and I am using Photoshop to create that series.

I am also creating several manuals to show kids how to use the computer to draw. This lesson is part of my picture book Kids Do Photoshop.

Before you begin this lesson, you should do lesson 1 of this series.
https://x55.68c.myftpupload.com/kids-do-photoshop-lesson-1-how-to-open-photoshop-draw-shapes/
This lesson will begin the same way that lesson 1 began. First, you need to create a new document. Again, review that process in lesson 1.

I. Create A New Document
- On the far right, select the orientation for horizontal for now.
- Select Inches.
- For the width, enter 11″
- For the height, enter 8.5
- I suggest that you work in 72 pixels per inch–at least for now.
- Click on the Color box, and elect to work on a white background.
- At the bottom right corner of this screen, click the word that says “Create.”
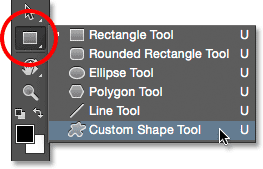
II. Click on the Custom Shape Tool in the Toolbar. Whatever shape you used last will show as the Shapes Tool Icon. You Might See An Elipse [Circle] or a Rectangle or something else. Click on the shape icon that shows and select the Custom shape. It looks sort of like a starry blob. It almost looks like Sponge Bob–sort of leaning to the right.

Once you have clicked on the Custom Shape Tool, look into the window on the top right of your Menu Bar. In the window, you will see whatever shape that you had used last. Click the tiny arrow next to the shape, and you will see all the Custom Shapes that are currently loaded on your computer.
III. Reset Your Custom Shapes in Photoshop
Day by day, I’ll gradually tell your about all the custom shapes that are available for you, but to keep things more simple, we’ll reset ONLY the default Custom Shapes for this lesson. Click on the tiny drop-down arrow beside the little wheel that is next to your gallery of custom shapes.
From the Drop-Down Menu, select “Reset Shapes.”

The Default Custom Shapes in Photoshop


Once you have opened the gallery of the default shapes, scroll down to see all that are there.


We’ll begin by selecting the shape that looks like a daisy.
Click on the Daisy Icon and Click on your workspace. Drag and Draw daisy shapes. I drag and draw down and to the right. Do not release your mouse until you select your color from the color palette.
I explain selecting a new color in Kids Do Photoshop Lesson 1.
https://x55.68c.myftpupload.com/kids-do-photoshop-lesson-1-how-to-open-photoshop-draw-shapes/
Let’s Talk about Layers in Photoshop
Now that you have drawn 3 separate daisies, you should have 3 separate layers in your layer panel. Your layers panel should be on the right side of your workspace.

If you do not see your Layers Panel, Click on the word “Window” on the top menu.

Click the tiny black arrow to access the choices that are in the Drop-Down Menu. Click on the word “Layers.”

A black arrow should appear to the left of the word “Layers.” After that, you should see you all the items that you have drawn so far.
We will go back to the rectangle tool to draw the stems on the flowers. To get out of the Custom Shapes, hover on that icon on the tools panel, All the Shapes Tools should appear in the Drop-Down Menu, Select the Rectangle Tool.
Drag and draw down to create a skinny flower stem. Before you release the mouse, color your stem green. If your stem is on a layer that is higher than your flower’s layer, the stem will be on top of your flower.

In the following images, you see that the stem layer is above the pink daisy. You also see the results of that layering order.


To pull the stem layer down, click on the layer in the layers panel, and pull the stem layer down and below the layer where the pink daisy is resting. Note that your stem is behind your flower now..
 .
.
Draw more stems with the rectangle tool, and arrange them so that each stem is below its partner flower.

Select the Custom Tools Again. This time, we’ll draw a flower box where our flowers will grow. I used the rectangle that seems to have been squished in the middle, and I drew a planter by pulling from left to right. After you draw the planter, you will need to raise it to the top of your layers in your layers panel.

To draw the leaves, I used the Custom Shape that looks like leaves are growing on a vine.

To draw the centers of the flowers, I used the Ellipse Tool or the Circle.
I also used the Ellipse Tool to draw the black polka dots at the bottom.
Check back on this Blog site often, I will share several free lessons from my new book Kids Do Photoshop.
Discover more from Jacki Kellum
Subscribe to get the latest posts sent to your email.